Let's assume you already have your new custom domain, and you're now trying to use it with your existing subdomain blogger. I'll give you tips on how to integrate it smoothly, straight-forward and to help you understand more I'll add screen shot to help you along with it.
Let's start.
In this tutorial I'll use my existing 5 years old blogger as a dummy.
1. Go to settings in the blogger dashboard, then click the basic option like the once shown in the screen shot.
Let's start.
In this tutorial I'll use my existing 5 years old blogger as a dummy.
1. Go to settings in the blogger dashboard, then click the basic option like the once shown in the screen shot.
2. Look for publishing text, then click the link Setup a 3rd party URL for your blog. See picture.
3. Now you'll add your custom domain name, take note that it should be written with "www" at the start. You'll be introduced with an error of the authentication of your domain after you've input it and click save. Do not be alarm, that's norm.
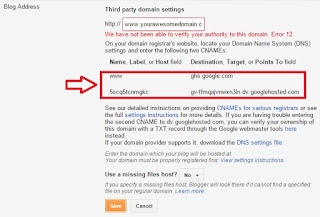
4. This time you'll be needing your domain name server log to link your domain to blogger hosting. What I'm referring is the website where you purchase your awesome custom domain. For the sick of explanation, I'll try to access my old top level domain as well and read carefully for the next instruction. Before anything else, you'll need the access code that was given to you by blogger. Wrote down those code in the picture or clip it up.
5. My old custom domain is bought at Godaddy so I'm gonna head over there and link the given code from Blogger. Go over your account the just hit manage. You don't have to click anything from then, just the DNS ZONE FILE. Then go to CNAME ELIAS table, remember the code I told you to wrote down? This is where you input those codes.
By default, it will only show 3 or 4 items on the table, just find the "www" under the HOST bracket. At the right end of that row, you'll find pen icon, click it then edit. Change the points to from the given code. At the top pic, it was written like this "ghs.google.com".
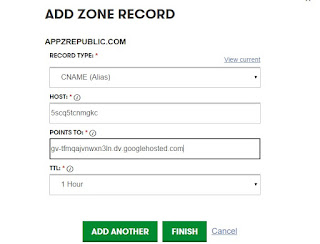
As you noticed there is another set of code below the first given code by blogger, that means you'll add one more CNAME ELIAS record. Just at the top of the table you can see a visible link there saying Add Record.
6. Just follow the pictures according to what given codes you had, don't copy the once in my print, it was given uniquely for your blog only. Hit finish.
7. If you go to this Blogger Instruction you're now at the final stage of integration. It was number 9. in that link. We will now add IP address's for your custom domain, blogger already provide 4 ip as you can see in that instruction. At the top-end in the DNS ZONE FILE you'll see A(host) table. That is where you'll add those given IP's. If you're a bit confused just follow the top pic in accordance to the pic below.
Just input all the IP's, you can manually do it one by one or you can just hit add more.
Congratulations! Just wait 10min - 1hr for the sync to apply.
One more thing! After all up and running just make sure you click redirect all given domain name towards "www". Just go back pic instruction 2 then hit edit. Tick redirect.
I hope you enjoy my short tutorial, if you have any question, drop me a comment let's see if we can figured it out.


Comments
Post a Comment